DIY paper clip earrings
November 29, 2011
 Recently I felt myself falling into sort of a creative rut. I took a little break from crafting and began perusing my favorite blogs as well as the always inspiring craftgawker. During my ventures, I stumbled upon a bunch of really fun new DIY projects, one of which I had to try right away –paper clip earrings. I love when I already have all of the materials required to complete a project. Anyway, after finishing one pair I was hooked. Not only did they turn out really cool, I strangely enjoyed the therapeutic motion of winding string around wire. I made a bunch of earrings trying both colored hemp and yarn. I gave a pair to my friend, Laura, for her birthday and was super excited to hear her say she “could totally picture them gracing the pages of the Anthropologie catalogue.” These earrings make unique holiday gifts, so I’m excited to pass along this tutorial. So here goes, my friends…
paper clip earrings
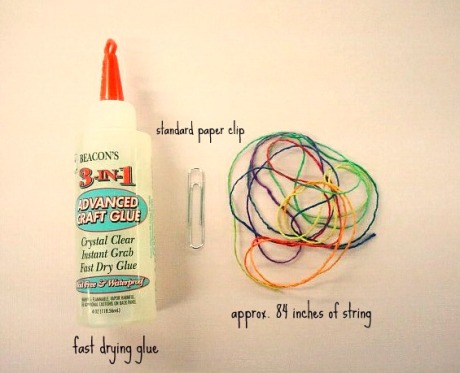
what you will need:
As far as the glue is concerned, one that dries clearly and quickly is ideal. I took a picture of only one paper clip, but obviously you will need two. Also, I know 84 inches sounds like a lot of string, but if you plan to wrap them the way I did, in a continuous pattern with minimal knots, it is best to use one really long piece of string. Anyway, next you will unbend the paper clip at all of the rounded edges…
Once the edges are all open, you will shape it into a triangle. The open side of the triangle will overlap a bit, which makes it easier to bind the sides together. Next you should tie a knot, secured with glue, at a point on the triangle, like so…
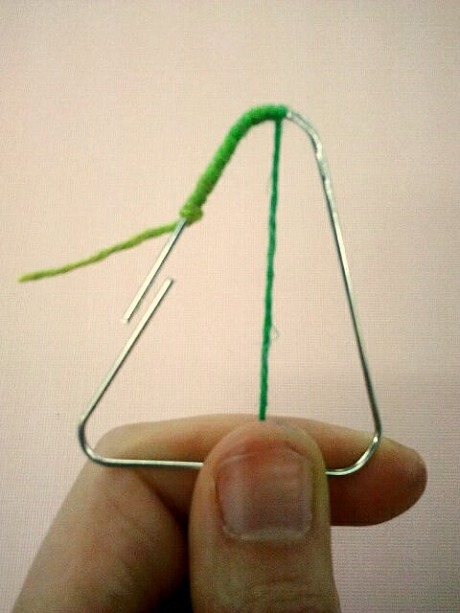
Add a tiny bit of glue to a small area of the paper clip, as it will dry pretty fast, and wrap the string around and around in a tight fashion. I try to wind the string away from the opening so that I may use it to my advantage. Rather than spending lots of extra time pulling the ridiculously long piece of string through the triangle with each turn, you can simply slide it in through the opening. You will see what I mean…
Please excuse my poorly trimmed nails:) The only tricky part of this project is wrapping the overlapping, open side of the triangle. I tried to overlap the sides one on top of the other rather than side by side so it would be less visible. Just do your best to hold them in this position with a good amount of glue while you wrap. It’s really not that hard, I promise. Once the string wraps all the way around, wrap it to a point just below the top of the triangle so you may begin the infinitely easier task of wrapping it across the triangle. Try not to go too crazy with the glue so the earrings look nice and neat. I left space at the top and bottom because the string is most secure from unraveling. When you reach a stopping point, tie a knot and secure it well with glue. They should somewhat resemble these…
That’s my friend Laura wearing her new earrings. I love how they happen to match her shirt perfectly! You can do so many different things with these earrings. Instead of wrapping them so tightly, you can make a sort of webbed, dream catcher look, and even add some beads to it…
If you decide to use yarn, you can achieve some really interesting looks. I should note that yarn is much more stretchy, so you won’t need nearly as much as you would with, say, hemp. I would go so far as to say you may need only half the amount. If you like the rainbow hemp, you can purchase some at a lovely shop called Hemp Hutt. I hope this tutorial was clear enough. This is my first one! Enjoy and let me know how it goes!
Of course, you will need some music for inspiration. Here is a random playlist of awesome songs.
Don’t worry, though. If you don’t feel like doing this, but you think the earrings look cool, I’m selling them in my etsy shop!


Beautiful! Love the rainbow colors! Great tutorial too.
I really liked your tutorial too:) Thanks for sharing this project. Great blog by the way!
I’ll be trying these tomorrow. Maybe even tonight!
Great! Let me know how it goes!
oh my God this is such a good idea….very impressive…
i m going to use this idea to make a charm for my cell phone…thanku soo much for the idea…:)
Sounds awesome! I’m glad I could share it with you:) Keep reading. There is plenty more where that came from!
what a great idea! i’m always looking for “theraputic” crafts for my youngest daughter who has a brain disorder….she loves anything with beads and yarn and string….you get the idea. 🙂 I am sure this will be a hit with her plus she is wanting to make something for her cousing for their chirstmas gift exchange and I think this is PERFECT! thanks so much for sharing your tutorial!
You’re welcome! This makes my day and they do make really great gifts:)
So awesome, I made 3 pair already today! 🙂 Love it!
Nice! They are addictive. I just keep buying more yarn to experiment with different patterns.
Isn’t this idea the best? I have been working on some, trying to see if I can make different shapes:
http://imgur.com/W73Es
I love your rainbow-colored ones!
Ooooh cool. I’m going to have to try those! I’ve been making so many of these over the holidays. It’s ridiculous.
thanks for sharing 🙂 i`ll make Christmas cards with trees 😉 made like that
That sounds like a great idea! Didn’t even think of that!
Great tutorial. You’ve inspired me to make some this afternoon. With different coloured thread, beads, etc the possibilities are endless. Thank you!
You’re so very welcome!
I love the green ones with the beads. They look amazing!
Thanks so much! I’m glad you like them:)
!!!!!!!
i absolutly love these! at my summer camp, they give you string to use, so definitly cant wait to try these! gonna make a pair for everyone in my cabin and be the best cabinmate ever!
I’m so glad you like them! Summer camp sounds like a great opportunity to work on these. I miss my summer camp days. I’d love to see your finished product. Have fun!